Setup a Kubernetes Cluster with Kubeadm
10 June 2025
PeternakClouds
![]()
In this post, I’ll write my notes about creating Kubernetes Cluster using a tool named kubeadm. Before that, let’s discuss what Kubernetes is ??
What is Kubernetes
Kubernetes is a portable, extensible, open source platform for managing containerized workloads and services, that facilitates both declarative configuration and automation. It has a large, rapidly growing ecosystem. Kubernetes services, support, and tools are widely available. (Kubernetes Docs Overview).
Kubernetes is a tools that we can used to manage large containerized applications. It gives us a good experience while managing hundred or thousands of containerization application.
Why do you need Kubernetes
Let’s have an analogy like this. For example, you have a big application that will deployed to production environment, so of course you will be managing the applications and ensure them with no downtime. Here one of the best of Kubernetes uses. Kubernetes will make sure your applications stay up by scalling them. For example, when one of your container application goes down, Kubernetes will automatically provision another container (usually called as a Pod) like previous container (scale).
Kubernetes Architecture
Lets see the powerfull architecture of Kubernetes.
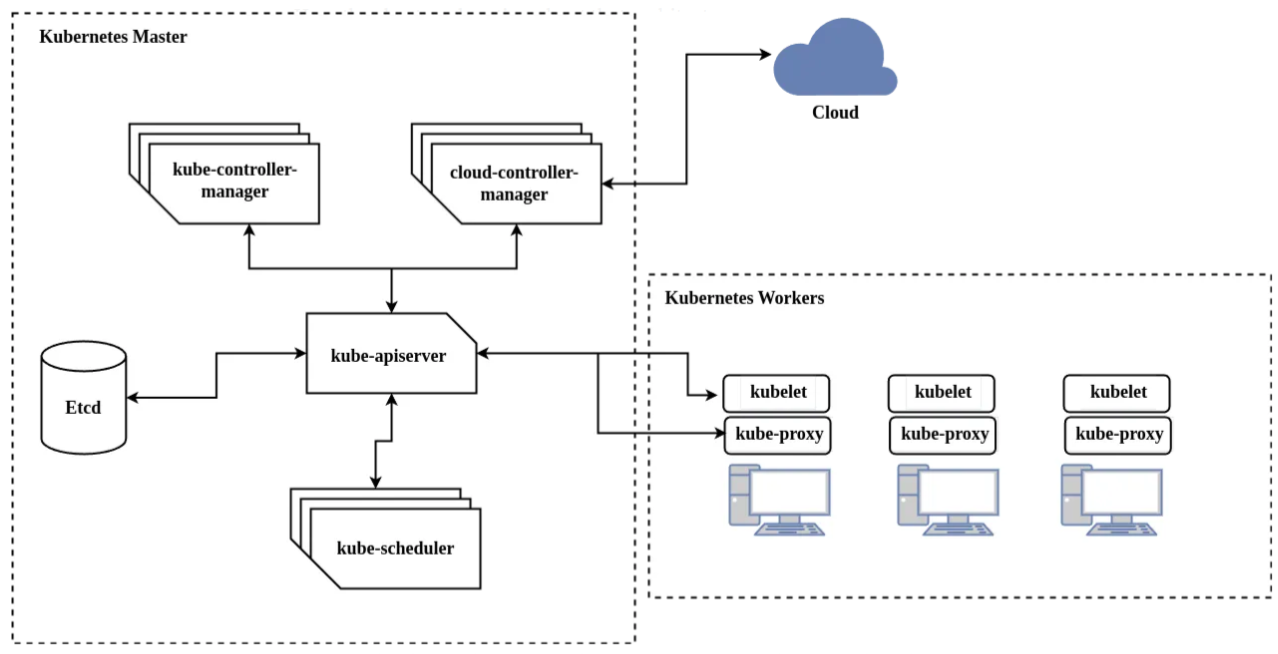
Here the short explanation about that architecture:
- Kubernetes Master (control plane) is a node that make a decission to the cluster. For example like scheduling, scalling or maybe destroying a Pod.
- Kube-apiserver is frontend of control plane components. This component expose the Kubernetes API so user can manage the cluster. The tool like kubectl is one of good command-line tool that used to manage Kubernetes cluster.
- Etcd or I call it a database component of Kubernetes control plane, it used to store key value data in cluster and use as backing store.
- Kube-scheduler is a component that watch newly created Pods. This component will assign a new created Pod to a node. It will spread the Pods into selected node. So by this way, we can get the high availability application because they’re not running only in one node.
- Kube-controller-manager is a daemon that acts as continous control loop in Kubernetes cluster. There some controllers in kubernetes cluster such us Node Controller, Job Controller and etc.
- Cloud-controller-manager is a component that lets us to link our cluster into Cloud Provider’s API such us AWS, GCP or another provider. This component will only run on specific cloud provider. If we use bare metal or such us on prem server to run Kubernetes, the cluster does not have this component (cloud-controller-manager).
Setup Cluster
After knowing about what is the Kubernetes and its architecture, Now lets begin to setup the Kubernetes Cluster. Before that, you may have to see the specific minimum requirements to run Kubernetes cluster. In this post, we have 1 Master Node and 3 Worker Nodes. The master node will be acts as a the cluster control plane.
Before that, we need to check the required ports that will be used by Kubernetes to communicate to each other. Execute below command to check required ports.
nc -zv 127.0.0.1 6443
Make sure that there’re no services in your environment use that port.
All Nodes (Master & Workers)
We need to change the each nodes hostname as well to make mapping easilly.
hostnamectl set-hostname k8s-master01
hostnamectl set-hostname k8s-worker01
hostnamectl set-hostname k8s-worker02
hostnamectl set-hostname k8s-worker03
Now, we need to enable overlay and br_netfilter modules.
modprobe overlay
modprobe br_netfilter
cat <<EOF | sudo tee /etc/modules-load.d/containerd.conf
overlay
br_netfilter
EOF
Oke nice, Now we will setup the container runtime. We will use containerd as the container runtime. Actually, there are another container runtime that we can use such us Docker and CRI-O, but in this post we will use containerd. For more information about the runtime, go a head in this link.
apt-get update
apt-get install -y containerd
mkdir -p /etc/containerd
containerd config default | sudo tee /etc/containerd/config.toml
vim /etc/containerd/config.toml

# find a line SystemdCgroup = false and change it into true
SystemdCgroup = true
Then, reload and enable containerd service.
systemctl daemon-reload
systemctl restart containerd
systemctl enable containerd
Now, we need to enable some sysctl configuration for Kubernetes Networking. This config will enable the cluster nodes to communicate effectively, enforce network policies, and handle traffic routing required for the smooth operation of the Kubernetes cluster.
cat <<EOF | sudo tee /etc/sysctl.d/99-kubernetes-cri.conf
net.bridge.bridge-nf-call-iptables  = 1
net.ipv4.ip_forward                 = 1
net.bridge.bridge-nf-call-ip6tables = 1
EOF
sysctl --system
Next, we will disable swap configuration to make the kubelet service running properly. If we don’t disable the swap, the kubelet service will not up.
swapoff -a
Next, we will configure the Kubernetes repository so we can install the Kubernetes tools such us kubelet, kubeadm and kubectl.
apt-get install -y apt-transport-https ca-certificates curl gpg
curl -fsSL https://pkgs.k8s.io/core:/stable:/v1.29/deb/Release.key | sudo gpg --dearmor -o /etc/apt/keyrings/kubernetes-apt-keyring.gpg
echo 'deb [signed-by=/etc/apt/keyrings/kubernetes-apt-keyring.gpg] https://pkgs.k8s.io/core:/stable:/v1.29/deb/ /' | sudo tee /etc/apt/sources.list.d/kubernetes.list
apt update
Now let’s install and mark the Kubernetes tools.
apt-get update
apt-get install -y kubelet kubeadm kubectl
apt-mark hold kubelet kubeadm kubectl
Master Only
In this step, we will init to bootstrap the Kubernetes cluster. Make sure to choose the master node to run this command.
kubeadm init --pod-network-cidr=10.20.0.100/16 --kubernetes-version=v1.29.0 --control-plane-endpoint=10.20.0.10:6443 --upload-certs
You may need to concern about the given args in above command. The --pod-network-cidr=10.20.0.100/16 is to specify the IP Address range (CIDR block) for the pod network in Kubernetes Cluster. --control-plane-endpoint=10.20.0.10:6443 is to specify the control plane endpoint (Master node IP). please check you ip configration first and make sure to set correct IP and subnet base on your network. And --upload-certs is used to upload the kubeadm-certs into our cluster. By adding this argument, we don’t need to distribute the certs manually when joining the worker nodes.
After init the cluster, you may need about 5–10 minutes based on your network speed. After the initialize is finish, you will get the join command, one for control plane and one for worker nodes.
# Control plane
kubeadm join <control-plane-ip>:6443 --token <token> \
        --discovery-token-ca-cert-hash <generated_hash> \
        --control-plane --certificate-key <cert>

# Worker nodes
kubeadm join <control-plane-ip>:6443 --token <token> \
        --discovery-token-ca-cert-hash <generated_hash>
Make sure to note that command, it can be used to join any control plane or worker nodes later.
Now, we will configure our account on the Control Plane Node to have admin access to the API server from a non-privileged account or maybe as root account.
# Non-privileged account
mkdir -p $HOME/.kube
cp -i /etc/kubernetes/admin.conf $HOME/.kube/config
chown $(id -u):$(id -g) $HOME/.kube/config

# Root account
export KUBECONFIG=/etc/kubernetes/admin.conf
Now, continue to setup the calico for Kubernetes networking. The calico Kubernetes Container Network Interface (CNI) as a plug-in and provides agents for Kubernetes to provide networking for containers and pods. You can directly go ahed to the Calico Official Documentation for more details.
Now, let’s follow the instruction from calico documentation to setup it.
First, we need to install calico operator which called tigera execute below command.
kubectl create -f https://raw.githubusercontent.com/projectcalico/calico/v3.28.0/manifests/tigera-operator.yaml
Then, we need to download the calico configuration file.
wget -O calico.yaml https://raw.githubusercontent.com/projectcalico/calico/v3.28.0/manifests/custom-resources.yaml
Next, we need to change the configuration by adjusting the CIDR based on our network subnet. Here my current configuration.
# This section includes base Calico installation configuration.
# For more information, see: https://docs.tigera.io/calico/latest/reference/installation/api#operator.tigera.io/v1.Installation
apiVersion: operator.tigera.io/v1
kind: Installation
metadata:
  name: default
spec:
  # Configures Calico networking.
  calicoNetwork:
    ipPools:
    - name: default-ipv4-ippool
      blockSize: 26
      cidr: 10.20.0.100/16
      encapsulation: VXLANCrossSubnet
      natOutgoing: Enabled
      nodeSelector: all()

---

# This section configures the Calico API server.
# For more information, see: https://docs.tigera.io/calico/latest/reference/installation/api#operator.tigera.io/v1.APIServer
apiVersion: operator.tigera.io/v1
kind: APIServer
metadata:
  name: default
spec: {}
Now, we will apply the calico configuration by running bellow command.
kubectl apply -f calico.yaml
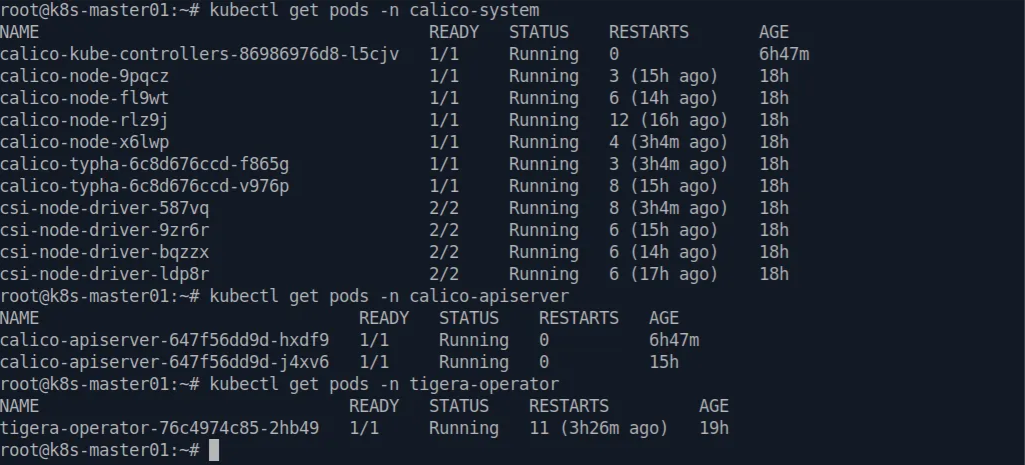
Let see the result of calico’s instalation. Run below command to see the result
kubectl get pods -n calico-system
kubectl get pods -n calico-apiserver
kubectl get pods -n tigera-operator
Workers Only
Now, we will join the worker nodes into Kubernetes cluster by using generated token above.
kubeadm join <control-plane-ip>:6443 --token <token> \
    --discovery-token-ca-cert-hash <generated_hash>
Or if you miss the token, you can print it by execute this below command in master node.
kubeadm token create --print-join-command
After joining the nodes, you can now check in your master node. Your cluster is ready to use :)
kubectl get nodes

Good :) . Now, we will try to deploy simple nginx Pod in the cluster. Create new file called nginx-test.yaml and paste below config file or use your own configuration.
---
apiVersion: v1
kind: Pod
metadata:
  name: nginx-test
  labels:
    app: nginx
spec:
  containers:
    - name: nginx-pod
      image: nginx:latest
      ports:
        - containerPort: 8080
Now, apply that configuration by running below command.
kubectl apply -f nginx-test.yaml
Now, you can see deployed pod in your cluster by running this command.
kubectl get pods
Let’s try access the nginx page, first we need to logged into pod’s shell by using this command and then run the curl command.
kubectl exec -it nginx-test -- bash
curl http://localhost
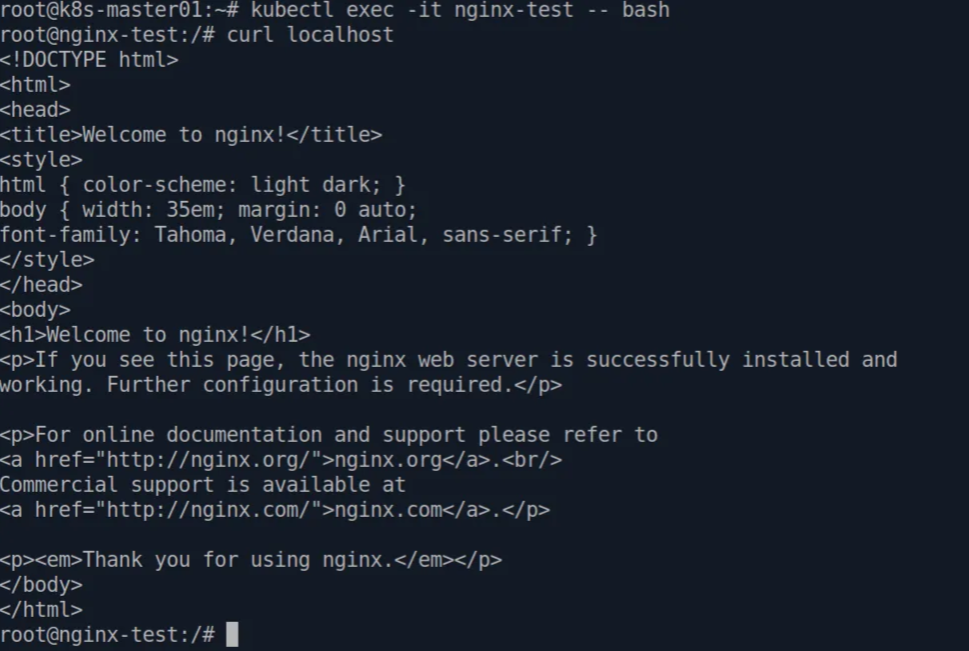
Excellents, now we have our application deployed in Kubernetes cluster.
You can try more by using another configuration such us to create Services, ReplicaSet, Deployments or another. You can read the Official Kubernetes Documentation for more details.